Finally!!! This blog was pending to be born ages ago, but its better late than never. I had been doing some research around NServiceBus for a week now and thought of putting up a simple tutorial for beginners like me who find it hard to step into this technology. Having worked on .Net and web technologies from the beginning of my career, I initially felt NServiceBus was just another component that can be made use of in bits and pieces of my projects. But I got that completely wrong as NServiceBus in itself is a complete architectural base for developers to implement and end-to-end solution(if you start liking it).
In this post, I am not going into the details of what NServiceBus does and how it is designed. The best source of information about it is Udi Dahan’s blog (the man who created NServiceBus) and NServiceBus official site.
Let’s step into the tutorial right away.
This tutorial describes a step-by-step way of implementing a simple Client-Server project using NServiceBus in .Net 4.0. For the most obvious reasons of dealing with real-time web applications, I have used a Web client here.
Before, we start implementing the project, please check the following pre-requisites.
1. Download the latest NServiceBus package from the official site.
2. Extract the zipped package into a folder and use the dlls from the folder \.net 4.0\binaries\ for referencing in our project.
I have divided the entire solution into 3 modules for simplicity of this tutorial.
Module 1 – Create a Message component
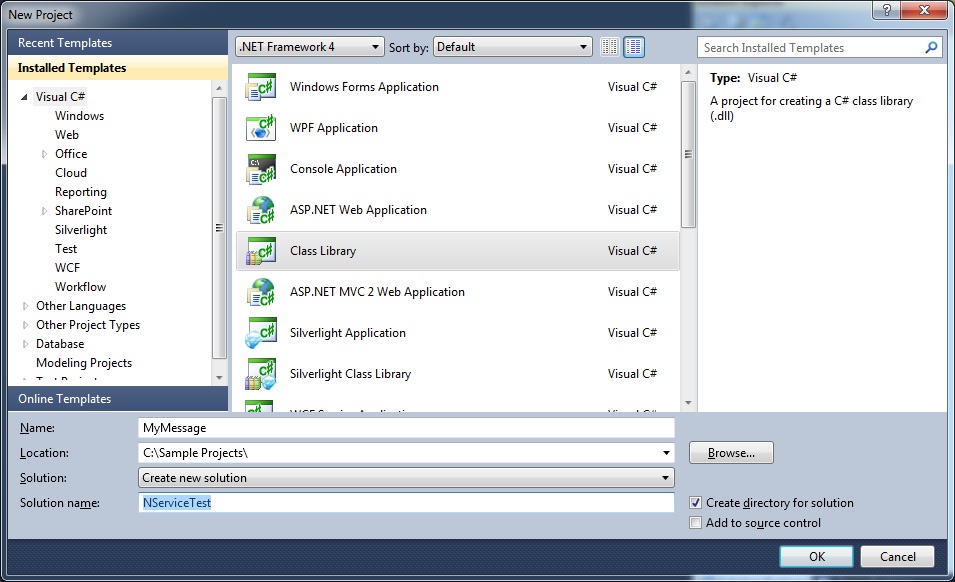
Step 1.1: Create a new Class Library project and name it “MyMessage” and name the solution “NServiceTest” (I have used simple and quick names and conventions for this tutorial. You can use your own names and conventions)

Step 1.2: Add reference to the NServiceBus.dll from the binaries folder in your downloaded packages. After the reference is added, make sure you set the “Copy Local” property to True in its properties window.

Step 1.3: Open MyMessage.cs file and enter the following code. For simplicity, the class contains two public properties id and name. The key point to note here is the using statement which includes NServiceBus and that the class inherits the IMessage interface. The IMessage interface here indicates that MyMessage class represents the message format that is to be sent across the bus.
using System;
using System.Collections.Generic;
using System.Linq;
using System.Text;
using NServiceBus;

namespace MyMessage
{
    public class MyMessage: IMessage
    {
        public int id { get; set; }
        public string name { get; set; }
    }
}
Step 1.4: Build the MyMessage project. The generated MyMessage.dll will now be available in the bin folder of the project (We need to use this dll as a reference in the following modules in this tutorial).
Module 2 – Create the Server
Step 2.1: Create a new Console Application Project and name it “MyServer”.

Step 2.2: Add references to the following dlls. Its better to copy the dlls from the binaries folder to the local bin\Debug folder of the project and add a reference locally. Please note that the Message.dll should be copied from the output folder of MyMessage project.

After the references are added, the References section would look like below.

Step 2.3: Rename the file Program.cs to ServerEndpoint.cs. Open ServerEndpoint.cs and enter the following code.
using System;
using System.Collections.Generic;
using System.Linq;
using System.Text;
using NServiceBus;
using MyMessage;

namespace MyServer
{
    public class ServerEndpoint: IHandleMessages
    {

        public void Handle(MyMessage.MyMessage message)
        {
            Console.WriteLine("Received Id = "+message.id.ToString());
            Console.WriteLine("Received Name = "+message.name.ToString());
        }
    }
}
If you look at the code above, you would notice that this class implements the IHandleMessages interface, which indicates NServiceBus that this class has a handler for incoming messages. The Handle method performs the operations with the received message. I have kept it very simple without any exception handling.
Also note that we must include both MyMessage and NServiceBus namespaces here.
Step 2.4: Add a new class file and name it EndpointConfig.cs. Simply inherit the interfaces IConfigureThisEndpoint and AsA_Server to enable NServiceBus to know that this is configured as the server.
using System;
using System.Collections.Generic;
using System.Linq;
using System.Text;
using NServiceBus;

namespace MyServer
{
    public class EndpointConfig: IConfigureThisEndpoint, AsA_Server
    {
    }
}
Step 2.5: Add the following sections to the App.config file. The two main sections here are MsmqTransportConfig and UnicastBusConfig. The MsmqTransportConfig section species the name of the queue that this server represents. This name is then used by client to send messages to. The UnicastBusConfig section is left blank here as the server does not need to be explicitly configured to send messages back to the client queue, if the server needs to respond back that is. Again, for the simplicity of this tutorial, we only consider a one-way client-server communication here.

Step 2.6: An additional step that is required here for the server is to enable NServiceBus host to load from remote sources. I faced a runtime error when building the project without explicity configuring this. Add a new App.Config file and rename it as NServiceBus.Host.exe.config. Enter the following config code in this file.

Build MyServer project and move on to the final module of this tutorial.
Modile 3 – Create a Web Client
Step 3.1: Add a new Web Application project.

Step 3.2: Add references to the following dlls. Its better to copy the dlls from the binaries folder to the local bin folder of the project and add a reference locally. Please note that the Message.dll should be copied from the output folder of MyMessage project.

After the references are added, the References section would look like below.

Step 3.3: Modify the Default.aspx page to include the following two textboxes and a submit button.

Step 3.4: Configure the global.asax file to include the settings for NServiceBus as below.
using System;
using System.Collections.Generic;
using System.Linq;
using System.Web;
using System.Web.Security;
using System.Web.SessionState;
using NServiceBus;

namespace WebApplication1
{
    public class Global : System.Web.HttpApplication
    {
        public static IBus Bus { get; set; }
        void Application_Start(object sender, EventArgs e)
        {
            Bus = NServiceBus.Configure.WithWeb()
                .Log4Net()
                .DefaultBuilder()
                .XmlSerializer()
                .MsmqTransport()
                    .IsTransactional(false)
                    .PurgeOnStartup(false)
                .UnicastBus()
                    .ImpersonateSender(false)
                .CreateBus()
                .Start();
        }
Step 3.5: Write the following simple piece of code in the code behind file of Default.aspx. The button_click handler creates a message object for MyMessage and sends it over the bus configured in global.asax.
using System;
using System.Collections.Generic;
using System.Linq;
using System.Web;
using System.Web.UI;
using System.Web.UI.WebControls;
using MyMessage;
using NServiceBus;

namespace WebApplication1
{
    public partial class _Default : System.Web.UI.Page
    {
        protected void Page_Load(object sender, EventArgs e)
        {

        }

        protected void btnSubmit_Click(object sender, EventArgs e)
        {
            var message = new MyMessage.MyMessage { id = Convert.ToInt32(txtId.Text), name = txtName.Text };
            Global.Bus.Send(message);
        }
    }
}
Step 3.6: Modify the Web.config file to add the following sections along with the exisiting configuration settings.
The only difference between the config section for the server and this client is that we explicitly specifiy the server’s queue name in the UnicastBusConfig to send messages to. without this, NServicesBus will not know which queue to send messages to. Also, give a name “MyWebQueue” to the client queue in the MsmqTransportConfig section.

With this step, Module 3 is completed and is all ready for Build.
Final Review – Before you build the entire solution and run it, you need to perform a quick checklist to ensure that you do not encounter run-time errors (which I had initially faced).
Check 1: In the NServiceTest solution properties, select Multiple startup projects and set Action as Start for MyServer and WebApplication1

Check 2: Open each project’s properties and verify whether the Target Framework is set to .NET Framework 4 and the Platform Target under Build tab is set to Any CPU for all the three projects. Any inconsistency in these settings might result in run-time errors.


That’s It! You are all set to run the solution. When you hit the run button, your server would open up in a console and will be waiting for a message from the client. If you look at the MyServer’s console, you would see a message MyServerQueue initialized which indicates the server queue is ready to receive messages.On the browser, the web client will open the default page ready to send a message.

Once you enter the values in the text boxes on the form and hit the submit button, the server’s console will immediately display the values sent.

That brings me to the end of this post. I hope this helps beginners of NServiceBus to kick-start their implementation in real-time projects.